Documentation & Tutorials
Comprehensive guides to help you get the most out of PineXchange
Quick Navigation
Setting Up Telegram Notifications
PineXchange allows you to receive real-time signal notifications via Telegram. Follow these steps to set up Telegram notifications:
-
Create a Telegram Bot
Start a chat with @BotFather and use the /newbot command to create a new bot.
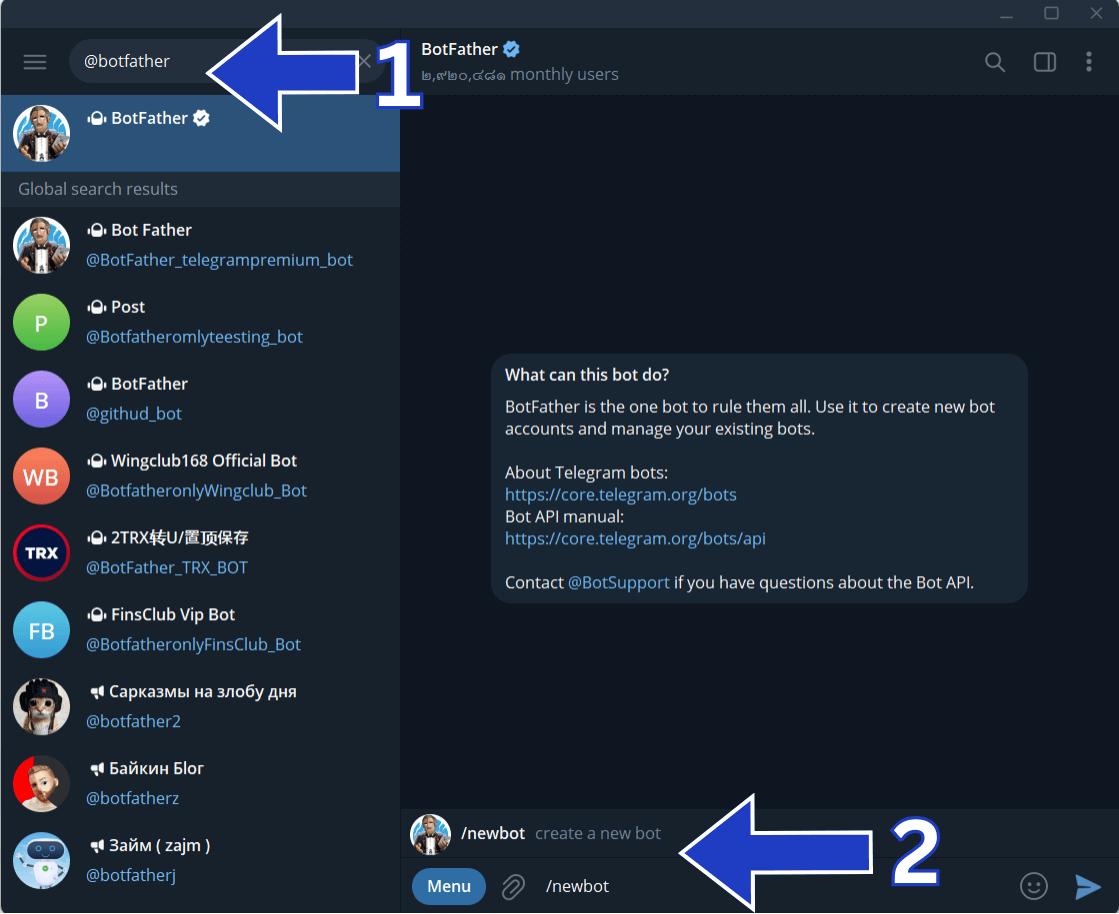
Screenshot showing the process of creating a new bot with BotFather using the /newbot command
Steps to create a Telegram Bot:
- Open Telegram app and search for @BotFather
-
Start a conversation and type
/newbot - Set a display name for your bot (e.g., "PineXchange Signals")
- Set a username for your bot (must end with "bot")
- When successful, you'll receive a Bot Token needed for the next step
-
Get Your Bot Token
After creating the bot, BotFather will give you a token. Copy this token as you'll need it for the next step.
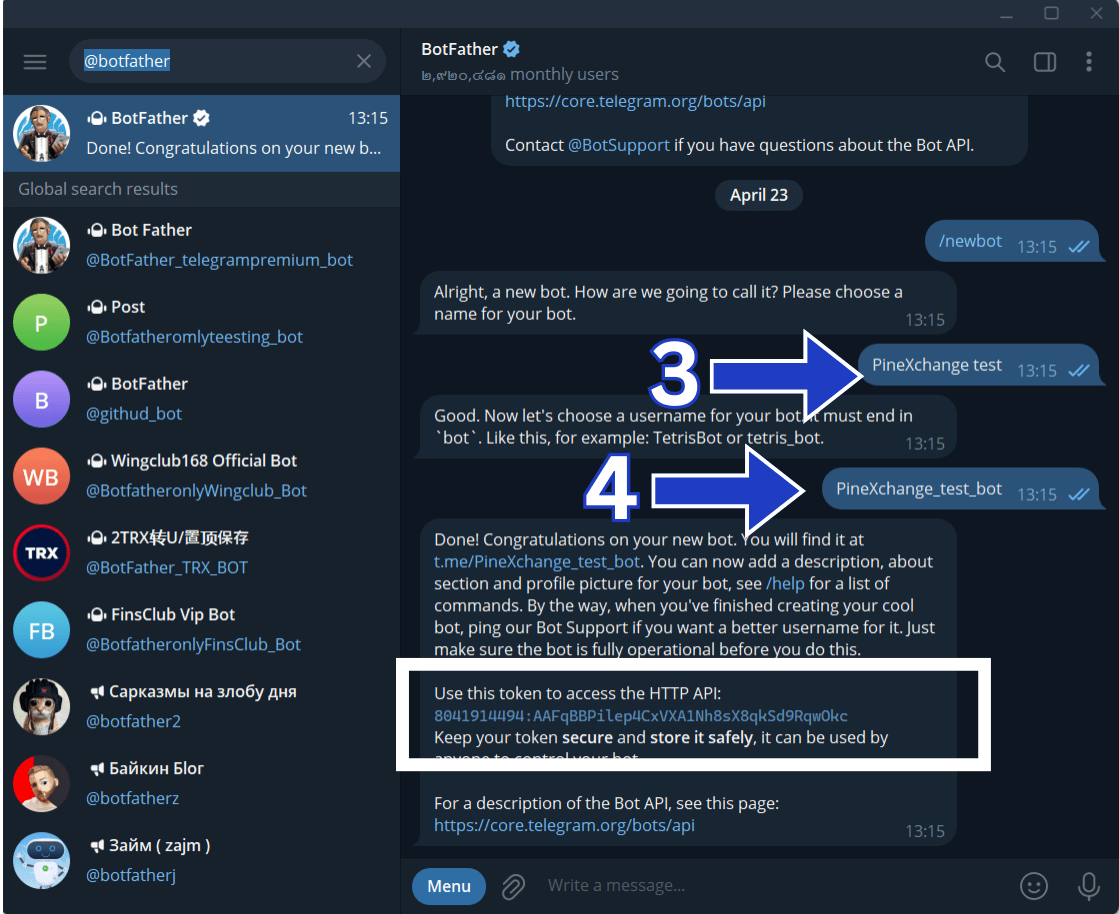
Screenshot showing the bot token provided by BotFather after successful bot creation
About Bot Tokens:
- Bot Tokens are long alphanumeric codes
- Keep your token secret, like a password
- In the example image, part of the token is blurred for security
- Copy the entire token without adding extra spaces
- If you lose your token, you can request a new one from BotFather
-
Get Your Chat ID
Start a conversation with your new bot, then visit @userinfobot which will display your Chat ID.
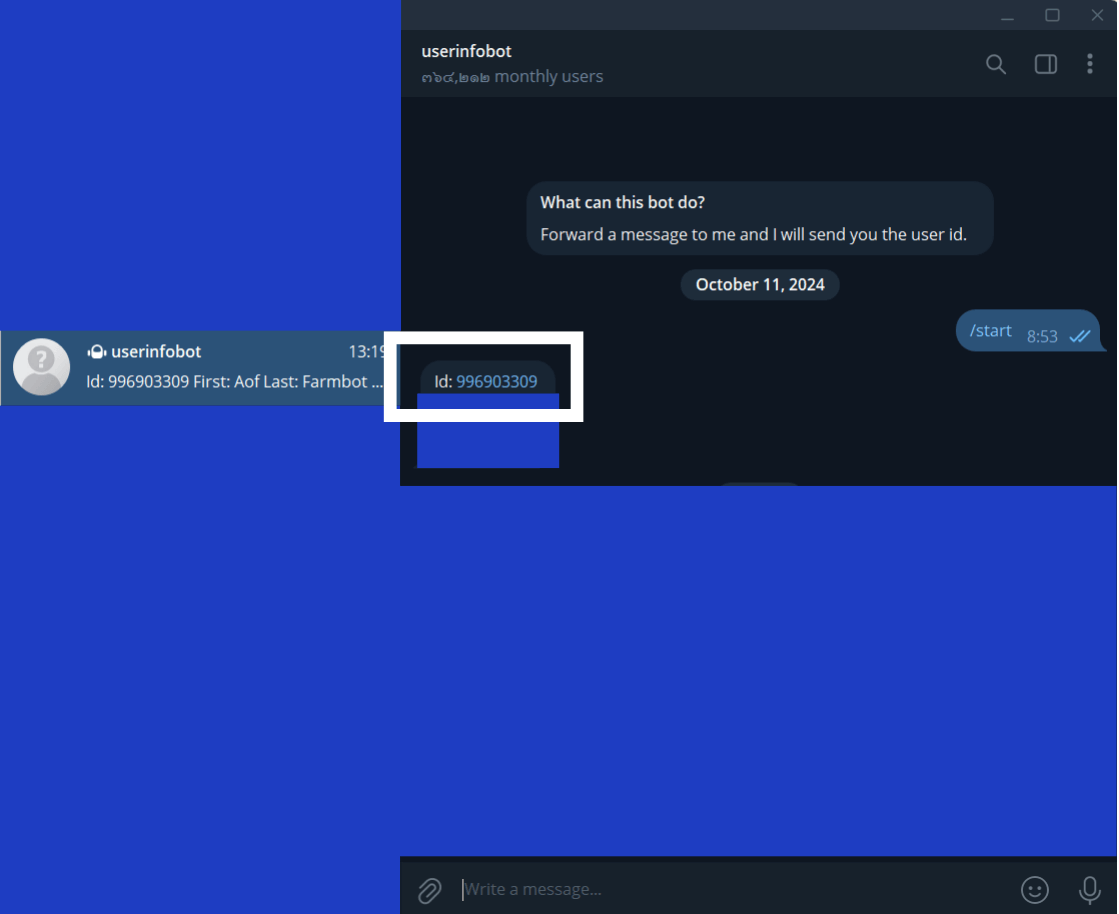
Screenshot showing how to get your Chat ID from @userinfobot
How to get your Chat ID:
- First, send any message to the bot you created
- Then search for and start a chat with @userinfobot
- This bot will display your information including your Chat ID
-
Chat IDs are typically numbers, like
123456789 - Copy this Chat ID to use in PineXchange settings
-
Configure in PineXchange
Go to Settings in your PineXchange account. Scroll to the Telegram Notifications section and enter your Bot Token and Chat ID. Then click "Enable Telegram Notifications" and save your changes.
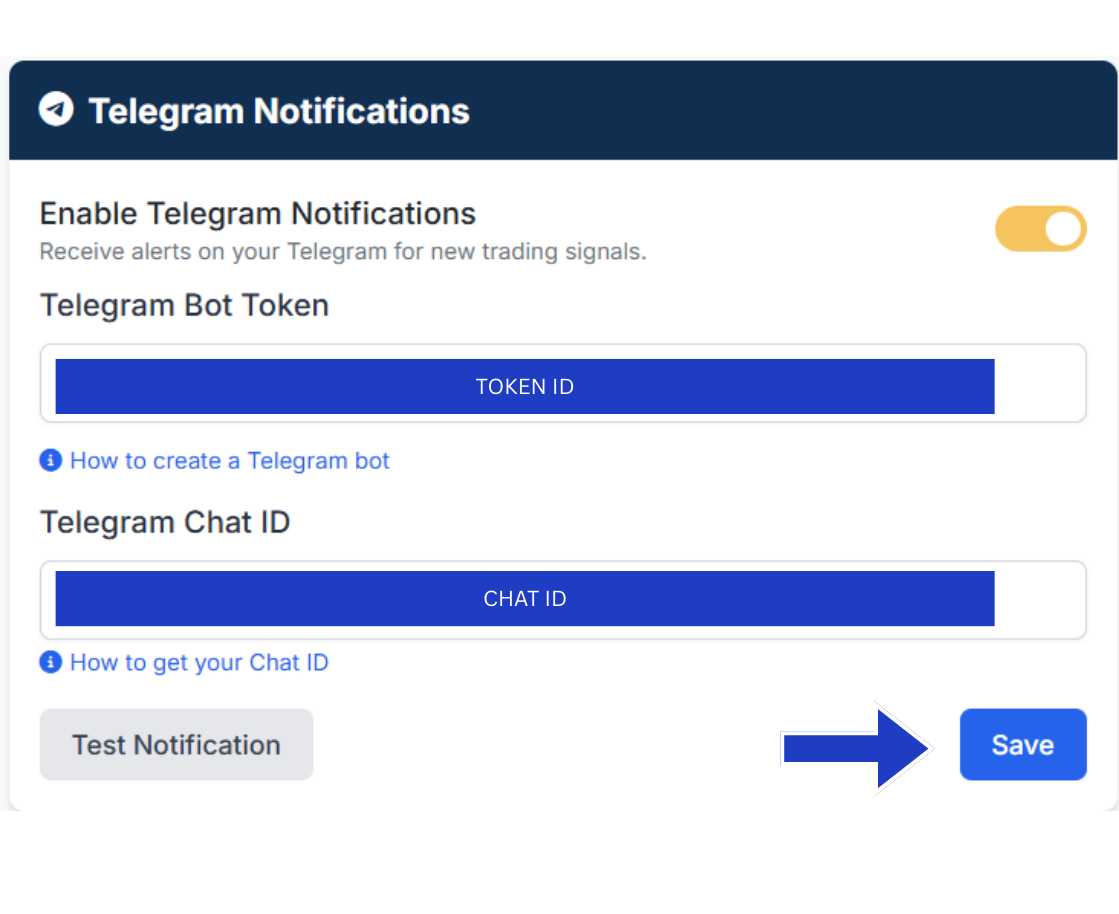
Screenshot of the Telegram notification settings panel in PineXchange
-
Test Your Configuration
Use the "Send Test Notification" button to verify your setup works correctly.
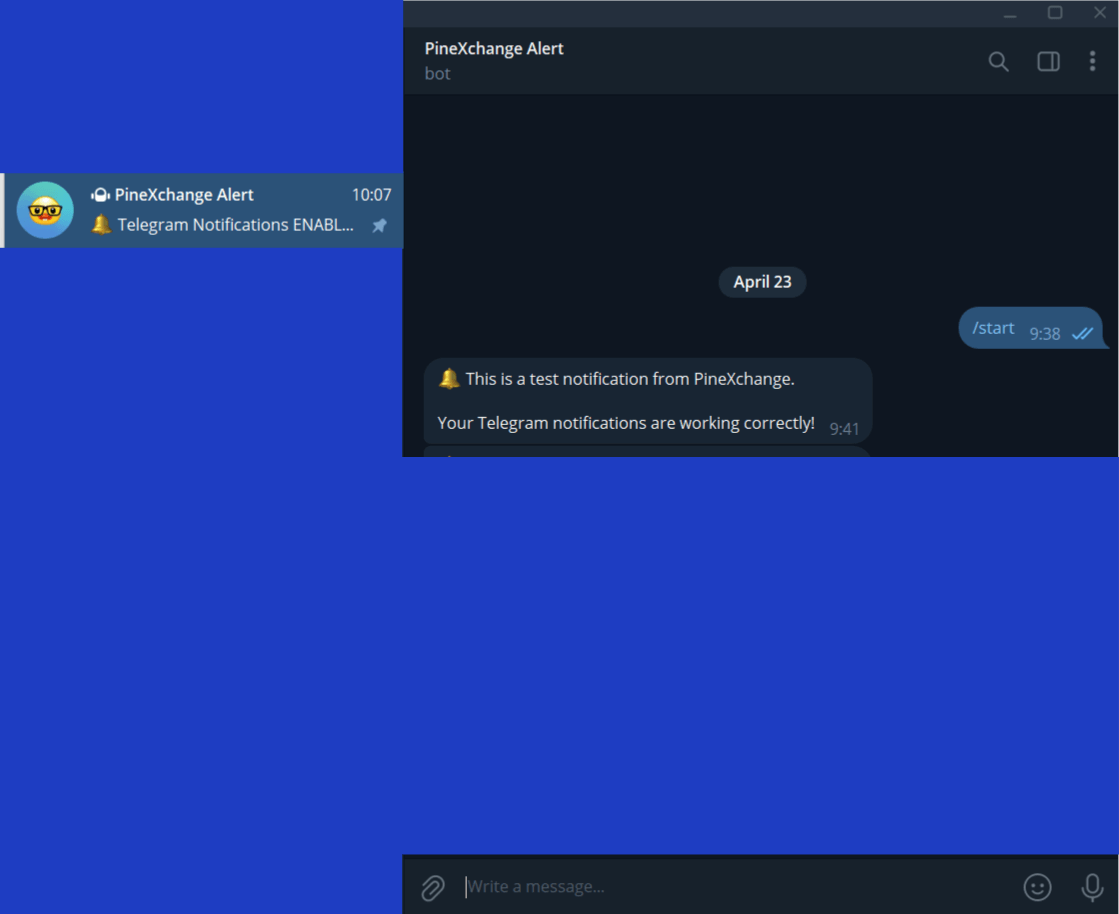
Screenshot showing a successful test notification received in Telegram
Testing your setup:
- Click the "Send Test Notification" button to test your setup
- Check that you receive a notification in the Telegram app
- If you don't receive a notification, double-check your Bot Token and Chat ID
- Make sure you've started a conversation with your bot
Setting Up TradingView Webhooks (Video Guide)
Watch this video for a complete walkthrough on setting up the PineXchange EA and integrating it with TradingView alerts.
This video provides a step-by-step guide on how to install an Expert Advisor (EA) and integrate it with TradingView as an automated trading indicator.
Here are the details of the process:
-
Log in to the website and go to the EA download section
[00:08] -
Select the appropriate version for MT4 or MT5
[00:34] -
The EA will be downloaded and saved in your Downloads folder
[00:42]
-
In TradingView, set up four parameters: Buy, Sell, Exit Buy,
and Exit Sell
[00:50] -
Create a new layer in TradingView for this configuration
[01:08] -
Use indicators like EMA (Exponential Moving Average) to create
buy/sell signals
[01:24] -
Set up alerts in TradingView based on the chosen indicators
[02:51] -
Copy values from the website and paste them into TradingView's
alert settings
[02:46] -
Set up a webhook in TradingView to send signals to the EA
[04:20]
-
Open MT4 and go to "Open Data Folder"
[07:20] -
Place the downloaded EA in the "Experts" folder
[07:29] -
Refresh the Expert Advisors list in MT4
[07:38] -
Choose the desired currency pair (e.g., XAUUSD)
[07:48] -
Enable auto trading in MT4 and import values from the website
[08:05] -
Attach the EA to the chart and enter the necessary parameters,
including the license ID
[08:52] -
Set up the EA's settings such as lot size, stop-loss,
take-profit, and Magic number
[09:50]
-
For multiple pair trading, repeat the TradingView and MT4
setup for each pair
[13:09] -
Ensure each pair has a unique Magic number in the EA settings
[14:28]
EA Configuration
Configure your PineXchange EA settings for optimal performance. Below are explanations for each parameter in the EA settings.
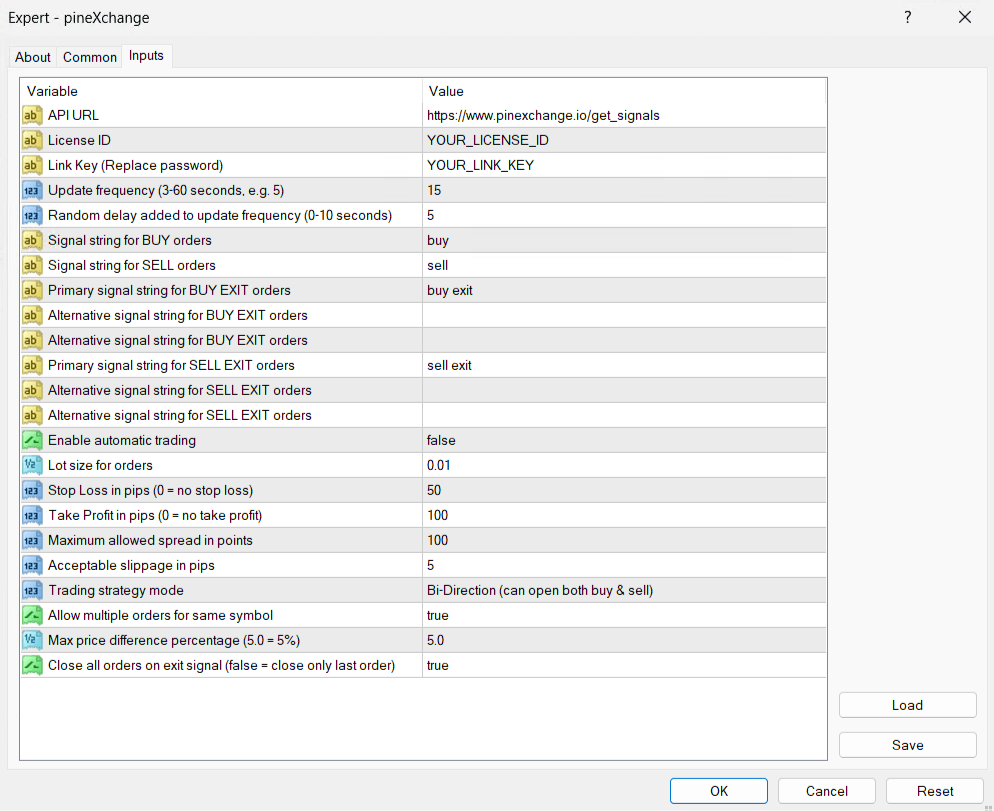
Screenshot of the complete EA settings dialog showing all configuration parameters
API Connection Settings
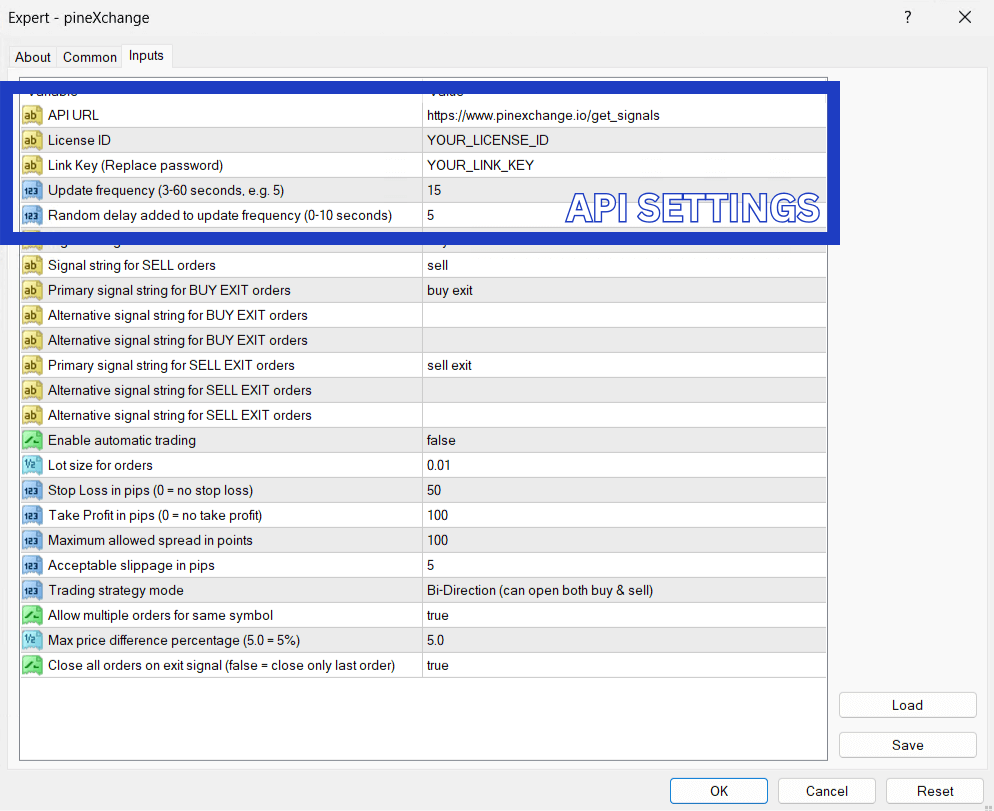
Screenshot highlighting the API Connection section of the EA settings dialog
-
api_url
Default: "https://www.pinexchange.io/get_signals"
The endpoint URL for retrieving trading signals. Do not change this unless instructed by support.
-
license_id
Default: "YOUR_LICENSE_ID"
Your PineXchange license identifier. You can find this in your dashboard.
-
link_key
Default: "YOUR_LINK_KEY"
The Link Key for the specific MT account. Copy this from your link keys page.
-
update_seconds
Default: 15 (Range: 3-60 seconds)
How frequently the EA checks for new signals, in seconds. Lower values provide faster signal processing but increase server load.
-
random_delay
Default: 5 (Range: 0-10 seconds)
Random delay added to update frequency to distribute server load and prevent all clients from requesting signals simultaneously.
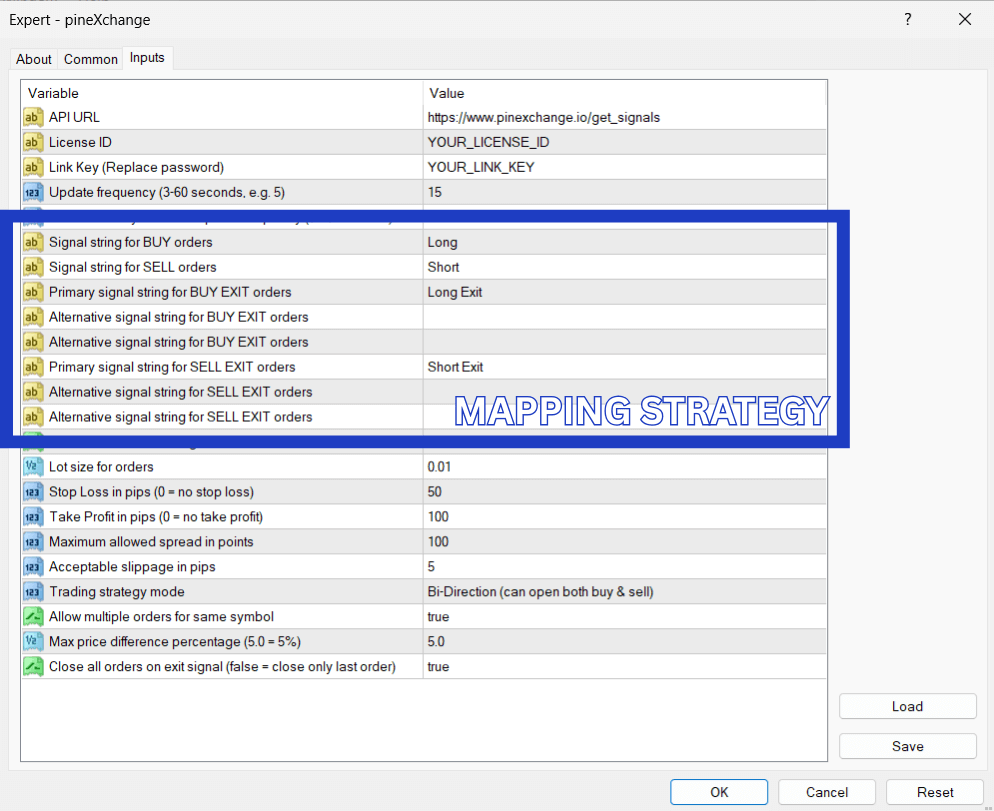
Custom Signal Mapping (Case-Sensitive)
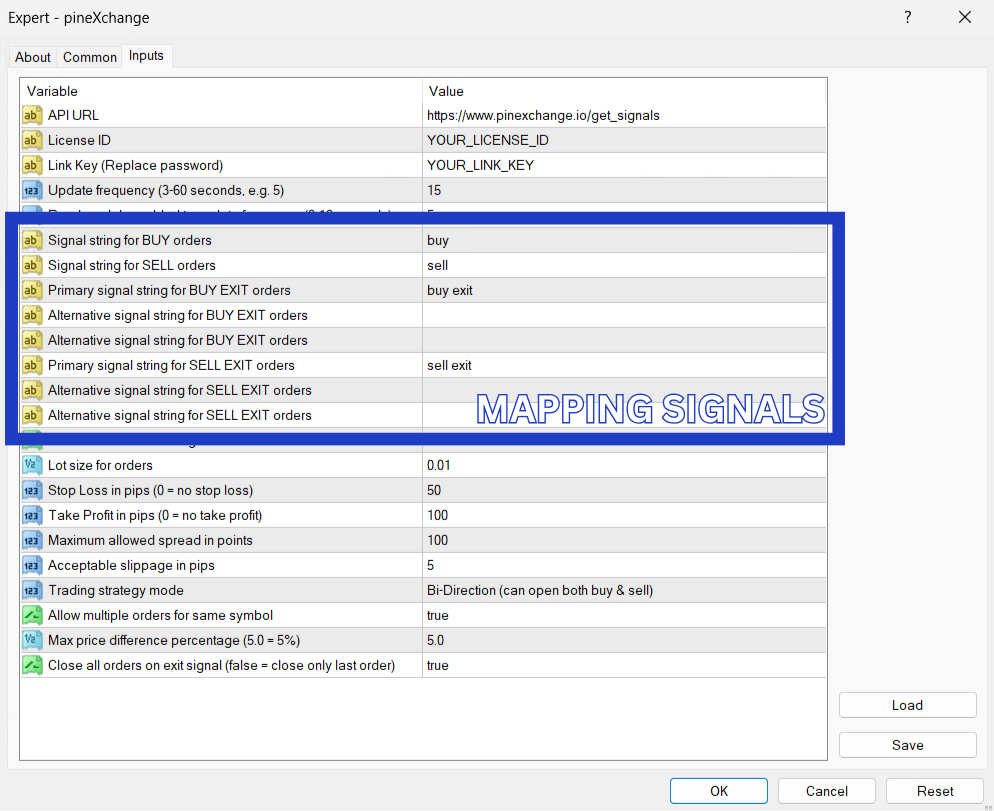
Screenshot showing the relationship between indicator JSON templates and their matching EA settings
Screenshot showing how to match strategy comments with EA settings
Before configuring this section, you need to understand which type of TradingView alerts you're using. There are two main approaches:
Important: The signal values are case-sensitive!
The text you set in these fields must exactly match the signals sent from TradingView, including uppercase/lowercase letters.
For Indicator-Based Alerts (JSON Template Method)
If you're using the JSON templates from the TradingView Webhooks section (Method 1), you typically don't need to change these settings, as the default values already match the template values:
JSON Template (TradingView)
"signal": "buy"
"signal": "sell"
"signal": "buy exit"
"signal": "sell exit"
Default EA Settings
UserBuySignal = "buy"
UserSellSignal = "sell"
UserBuyExitSignal1 = "buy exit"
UserSellExitSignal1 = "sell exit"
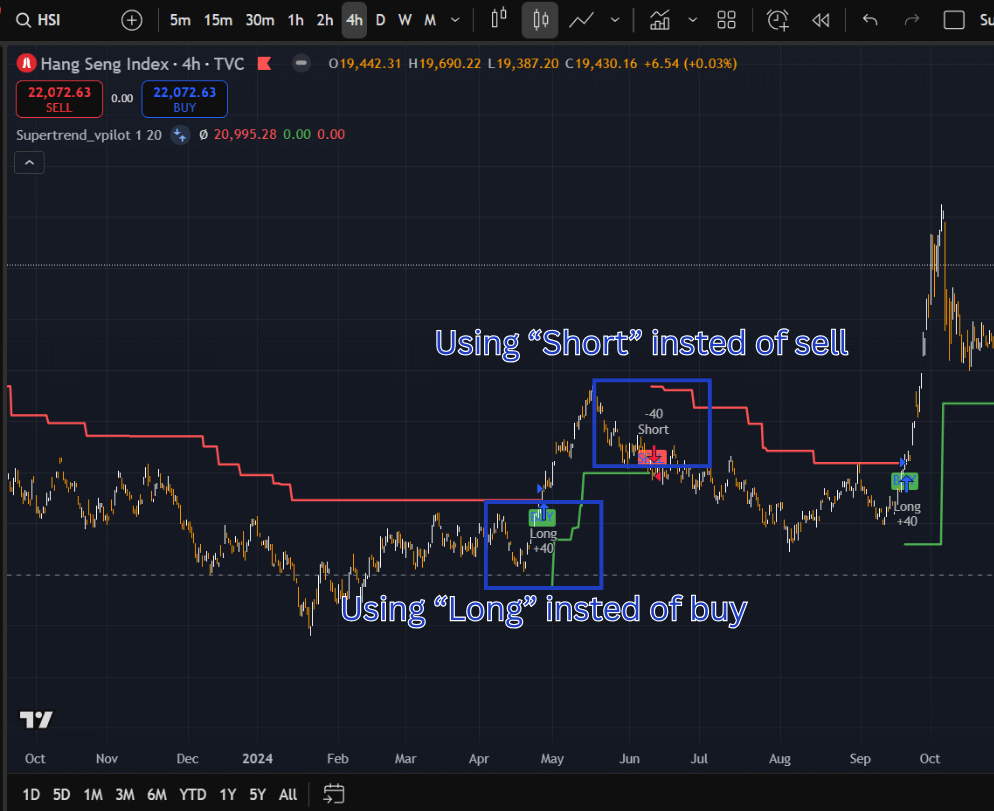
For Strategy-Based Alerts (Comment Method)
If you're using TradingView's strategy comments (Method 2), you need to check the actual comments used in your strategy code and set these fields to match:
- Open your TradingView strategy in Pine Editor
-
Look for the comments in your
strategy.entry()andstrategy.close()commands - Note the exact text used in each comment
- Set the EA parameters to match these comments exactly
Strategy Code Example
strategy.entry("Long", strategy.long, comment="LONG")
strategy.close("Long", comment="EXIT LONG")
strategy.entry("Short", strategy.short, comment="SHORT")
strategy.close("Short", comment="EXIT SHORT")
Required EA Settings
UserBuySignal = "LONG"
UserSellSignal = "SHORT"
UserBuyExitSignal1 = "EXIT LONG"
UserSellExitSignal1 = "EXIT SHORT"
Trading Settings
Screenshot highlighting the first part of Trading Settings section in the EA settings dialog
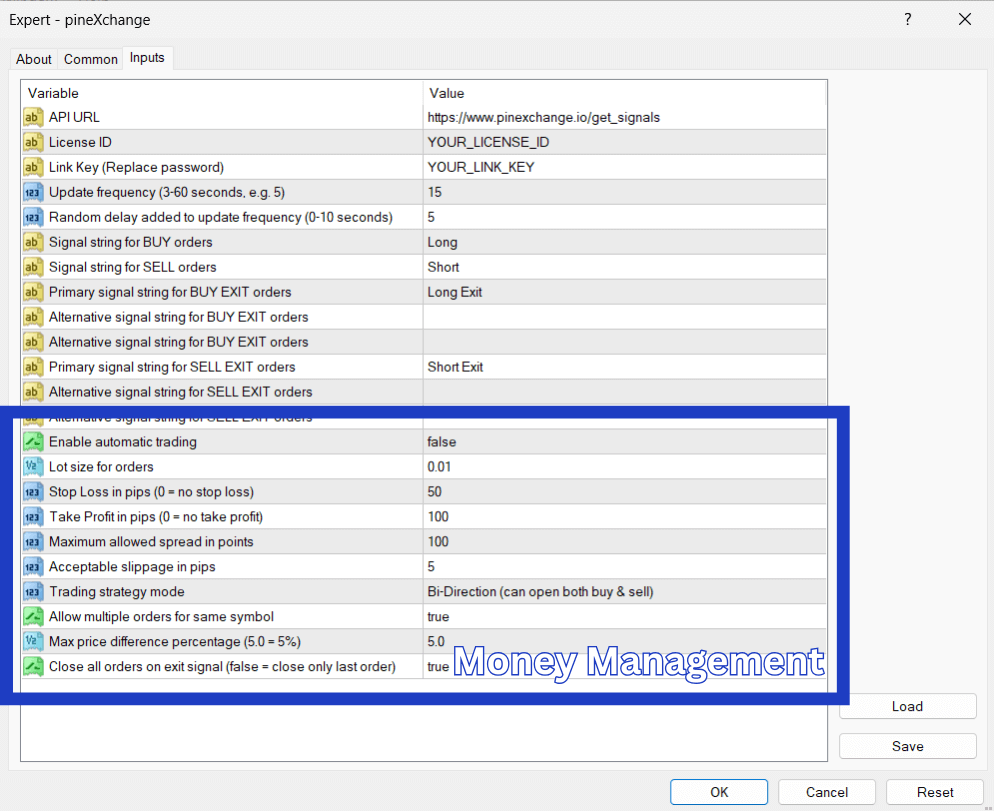
Screenshot showing additional Trading Settings options in the EA settings dialog
-
EnableTrading
Default: false
When false, the EA will only display signals without placing trades. Set to true to enable automatic order execution.
-
LotSize
Default: 0.01
Trading volume in lots for each order. For micro accounts, typical values are 0.01-0.1; for standard accounts, 0.1-1.0.
-
StopLoss
Default: 50
Stop Loss distance in pips. Set to 0 to disable automatic stop loss (not recommended).
-
TakeProfit
Default: 100
Take Profit distance in pips. Set to 0 to disable automatic take profit.
-
MaxSpread
Default: 100
Maximum allowed spread in points before rejecting a trade. Prevents trading during high-spread conditions.
-
SlippagePips
Default: 5
Maximum acceptable slippage in pips when executing orders.
-
TradingMode
Default: BI_DIRECTION
BI_DIRECTION (0): Allows both buy and sell positions simultaneously
ONE_DIRECTION (1): Closes opposite positions when opening a new position (e.g., closes all sell orders when opening a buy) -
AllowMultipleOrders
Default: true
When true, allows multiple orders of the same type for the same symbol. When false, only one buy or sell position per symbol is allowed.
-
MaxPriceDifference
Default: 5.0
Maximum price difference percentage (5.0 = 5%) between signal price and current market price before rejecting a trade. Prevents trading on stale signals.
-
CloseAllOrdersOnExit
Default: true
When true, closes all orders of a type when receiving an exit signal. When false, only closes the most recently opened order of that type.